About Us

Hi there. HoneyBeGood specializes in organic cotton, artisan textiles, and sustainable fabric for quilting, art and life. You'll find organic quilting fabric from local artisans, as well as well-known designers Amy Butler, Cloud9 Fabrics, Daisy Janie, Monaluna, Harmony Organic Art, Clothworks, Robert Kaufman and many more. We also carry eco-friendly batting and organic cotton thread in a range of colors. www.honeybegood.com

Search
Connect with HoneyBeGood

Entries in Projects (4)

Monday
Aug202012

One-of-a-Kind Placemats

These beautifully simple placemats are made from Kalamkari hand block prints on organic cotton.  A medium-weight stabilizer (poly/rayon) is added as a middle layer which acts as a light moisture barrier and gives the perfect amount of form. The backing is a simple off-white solid poplin from Kaufman's Pure Organic collection. 

I made mine to fit the width of the stabilizer which is 20". I made the height 14.5 because I wanted placemats that are big enough to fit plate, silverware and drink with room to spare. 

To avoid needing a binding, I simply sewed the three layers together with rights sides of fabric together, leaving a few inches along the bottom edge for turning. Once pressed, I top stitched along the outer edges to finish everything off.

Wednesday
Aug082012

Going to Guild Meetings in Style

I've decided the paperbag I've been using to transport my quilting supplies to and from Atlanta Modern Quilt Guild meetings is just not going to cut it anymore. Inspired by Betz White's Stitch-along Tote pattern and Cloud9's latest loveliness (simpatico), I whipped together a stylish bag in a couple of evenings. I'm not a fast stitcher; this was an easy and fun pattern.

The bag has a nice cuff at top that easily rolls down to create a stand-up catch-all for your paraphenalia. For fun contrast I used pinkish on-point for the lining.

I can't wait to show this off at the next meeting.

Sunday
Jun242012

Sew Easy Pillow Covers

I love how easy it was to give my old couch pillows new life with a bit of gorgeous fabric and a minimal amount of time at the sewing machine. No buttons, no zippers, no fuss!

The pillows shown are 20" square but you can modify the below instructions to fit the size you need (see bottom of post). I used a 7oz twill fabric to cover mine. Any quality heavy-weight muslin or home dec fabric will do. I've posted other fabric options at the bottom of this post (of course!) 

20" Square Pillow Covers with Envelope Closure

Materials Needed 

  • 1 - 21" x 21" fabric pieces
  • 2 - 21" x 14" fabric pieces
  • Heavier weight thread (machine quilting weight worked great for me)
  • Iron and ironing board

Assembly Instructions

  1. Turn under a long edge of the 21" x 14" fabric 1/2". Press. Turn again to create a hem. Press. 
  2. Top stitch pressed edge along the entire length to finish the hem. You will now have a 21" x 13" piece.
  3. Repeat for the second piece of 21" x 14" fabric.
  4. Place the 21" square fabric right side up on a work surface.
  5. Lay one of the 21" x 13" pieces right side down (so right sides are together) Align raw edges. 
  6. Lay the second 21" x 13" piece right side down, aligning the exposed raw edges of the bottom square. The two top pieces should overlap by a few inches. Pin all 3 pieces together at edges. See Diagram below.
  7. Sew a 1/2" seam around the outside of the square. Be sure and backstitch at the beginning and end to secure the thread.
  8. Trim corners to reduce bulk ensuring you don't clip into the seam. Turn and push corners out to get a nice form. Insert old (or new) pillow. 
  9. Relax and enjoy!

Assemby Diagram

Size Modifications

You can adjust these directions to cover just about any pillow. Allow enough fabric for a 1/2" seam allowance, so if you're making an 18" square cover, you'll need 19" wide fabric. Adjust the height of the smaller pieces accordingly. You will want the finished pieces to overlap about 4" 

Other Fabric Ideas


Friday
Jun152012

Weekend Project (or what to do with a huge expanse of brick wall)

This summer I'm not feeling very motivated to start a big quilt project. The combination of Georgia heat and quilt batting just isn't very appealing to me. But the drive to create things hasn't abated - not one tiny bit!

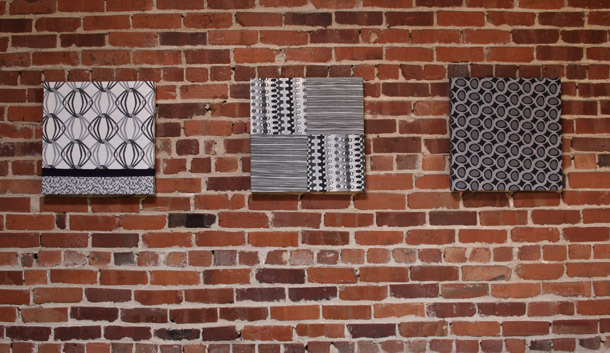
Our shop is located in an old cotton warehouse at the renovated Porterdale Cotton Mill. The walls are wonderfully rustic brick, 16 feet high, punctuated by the original longleaf pine1 pillars and beams. We adore this space and the tiny town of Porterdale, replete with it's unattended library and honor-system book borrowing. But what to do with the walls? 

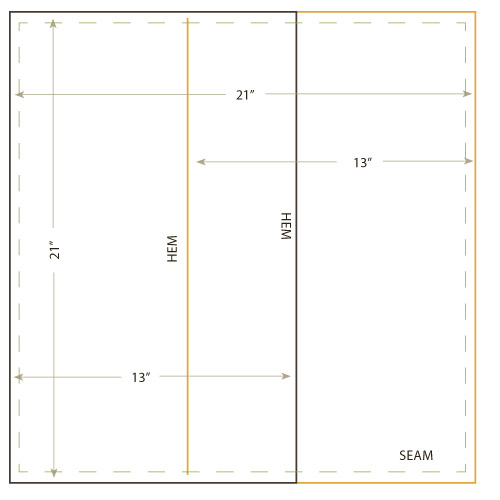
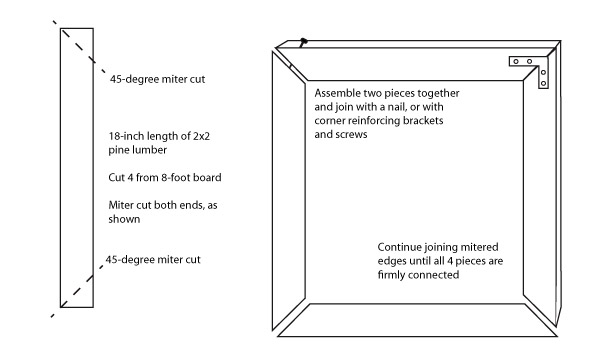
The answer came in the form of a few pieces of 2x2x8 pine lumber from the local hardware store and a couple of yards of fabric. In an afternoon we had three 18" square 'works of art' ready to adorn the walls. This project is wonderfully simple -

For one frame, you will need:

  • 1 - 2x2x8 pine board 
  • 4 - 2" nails or corner reinforcing brackets with screws
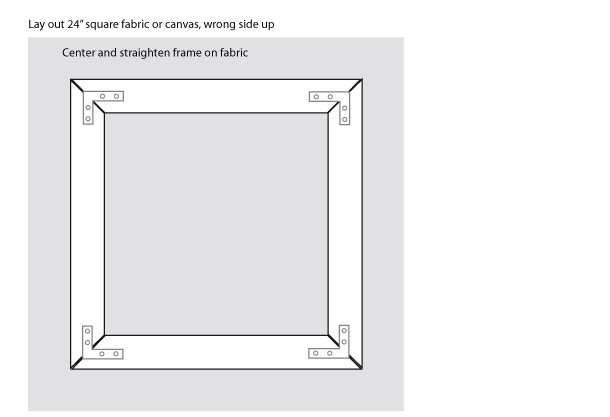
  • 1 - 24" x 24" fabric, whole or pieced
  • staple gun and staples or upholstery tacks and hammer
  • your choice of hanging hardware, if hanging on a wall, or display on a shelf.
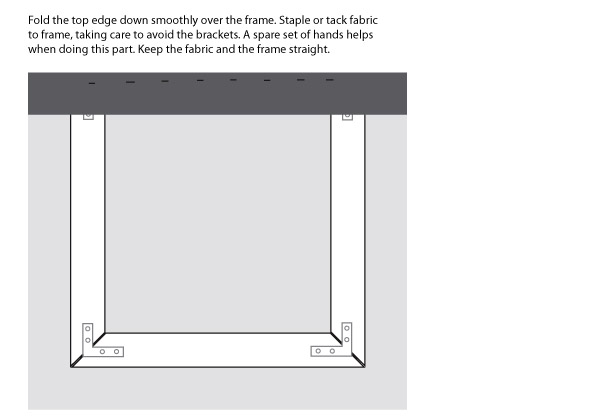
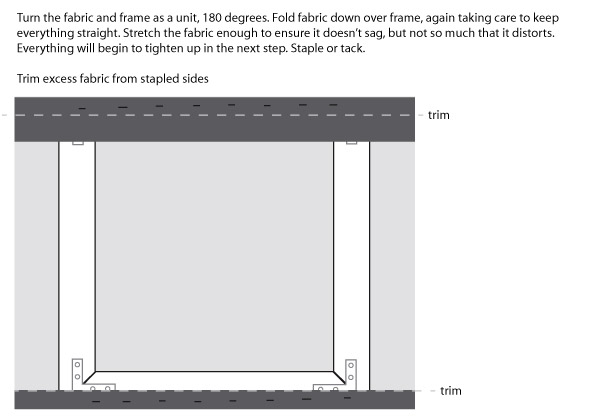
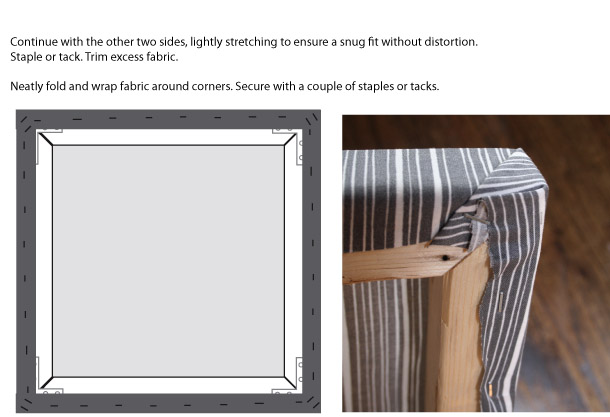
 Assembly:

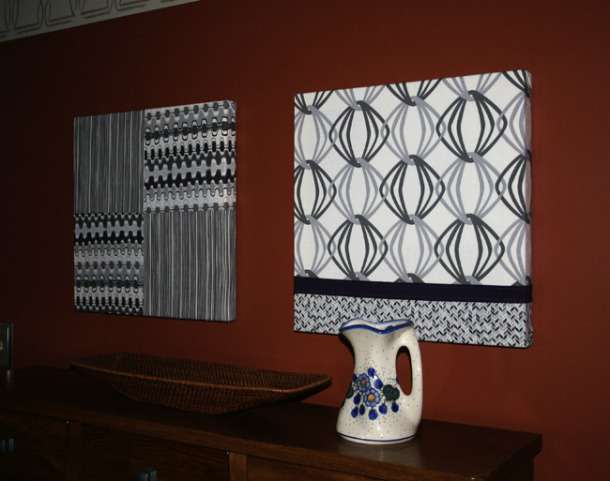
Et, voila! I hung two in our dining room before bringing them to the shop. Not too shabby, eh?

 Whatever you choose to do this weekend, Enjoy!


1 Longleaf pine is a slow-growing, hardwood pine native to the southeast USA. It was a very popular building timber as it is hard wood and long lasting (the beams in this building are over 100 years old). The large-scale timber industry here in the south between 1880 - 1920 devasted the longleaf pine forests. Today they are among the most endangered ecosystems in North America. There are a few virgin stands that remain. I've not visited yet, but understand they are unlike any other ecosystem. If you're interested in learning more this is a good place to start